
Specifications
Paper Business Cards
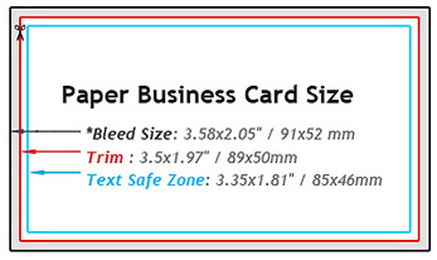
Note: 1 mm bleed area:
If You require printing to the edge after trimming, ensure that your artwork
extend 1mm beyond red trim line. Anything beyond trim line will be trimmed off.
If You require printing to the edge after trimming, ensure that your artwork
extend 1mm beyond red trim line. Anything beyond trim line will be trimmed off.
Plastic Business Cards
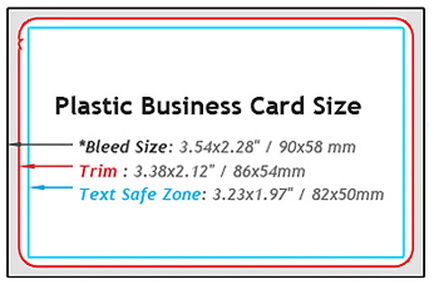
Note: All plastic cards come with rounded corners.
2 mm bleed area: If You require printing to the edge after trimming, ensure that your artwork extend 2 mm beyond red trim line. Anything beyond trim line will be trimmed off.
2 mm bleed area: If You require printing to the edge after trimming, ensure that your artwork extend 2 mm beyond red trim line. Anything beyond trim line will be trimmed off.
Mini Cards

Gold Plus, Silver Plus.... Business cards
Document size
3.54" x 2.28"
90mm x 58mm
1063 x 685 pixels
Document Trim Size (final size after being cut)
3.38" x 2.12"
86mm x 54mm
1016 x 638 pixels
Inside Design Size
3.19" x 1.93"
81mm x 49mm
957 x 579 pixels
Resolution 300 DPI
3.54" x 2.28"
90mm x 58mm
1063 x 685 pixels
Document Trim Size (final size after being cut)
3.38" x 2.12"
86mm x 54mm
1016 x 638 pixels
Inside Design Size
3.19" x 1.93"
81mm x 49mm
957 x 579 pixels
Resolution 300 DPI
We support a variety of file formats for uploading designs.
Adobe Acrobat Document (*.pdf) (recommended)
Adobe Illustrator Artwork (*.ai) (recommended)
Adobe Photoshop Image (*.psd) (recommended)
Bitmap Image (*.bmp)
CorelDRAW Image (*.cdr,*.clk)
GIF Image (*.gif)
JPEG Image (*.jpg,*.jpeg)
PICT Image (*.pic,*.pict,*.pct)
PNG Image (*.png)
PostScript File (*.ps)
Adobe Illustrator Artwork (*.ai) (recommended)
Adobe Photoshop Image (*.psd) (recommended)
Bitmap Image (*.bmp)
CorelDRAW Image (*.cdr,*.clk)
GIF Image (*.gif)
JPEG Image (*.jpg,*.jpeg)
PICT Image (*.pic,*.pict,*.pct)
PNG Image (*.png)
PostScript File (*.ps)
Bleed & Trim Marks
The very edges of the document are called the bleed area. To prevent an unwanted white border from showing at the edge of your document and ruining your professional business cards, be sure to extend any background colors or design elements all the way to the edge. Trim lines are the finished size of the document. The document is cut close to the trim line, but because of the mechanical tolerances involved in printing, the actual cut can happen anywhere between the bleeds and the safe margin. This is why it is important to keep your text and important images within the safe margin. This is the case for black and white or full color business cards.
Full Bleed vs. Trim Size
When to create your document as the full bleed size
If you are working in an illustration program (such as Adobe Illustrator or Corel Draw) or a photo editing program (Such as Adobe Photoshop or Corel Photo-Paint), we recommend that you create your document at the full bleed size. This will prevent any white edges from showing at the borders after the final product is trimmed and you order business cards.
If you are working in an illustration program (such as Adobe Illustrator or Corel Draw) or a photo editing program (Such as Adobe Photoshop or Corel Photo-Paint), we recommend that you create your document at the full bleed size. This will prevent any white edges from showing at the borders after the final product is trimmed and you order business cards.
Safe Area / Safe Margins
The safe margins are borders that are definitely inside the place where the cut will take place. Please remember to keep all important information, such as names, addresses, phone numbers or logos within the safe margin (at least .137” from the edge) to ensure that they aren’t cut off when your document is trimmed.
Resolution
Resolution refers to the number of dots per inch (dpi), or the amount of detail the image has. Most documents prepared for upload should be 300 dpi at 100% of the final print size. Higher resolution means a more detailed image, but it will result in longer upload time due to the larger file size.
PDF setting
If you are working in a layout program (such as QuarkXPress or Adobe InDesign) we recommend that you create your document at the trim size and include the specified amount of bleed for your product (.137”). It is recommended to convert to PDF. As for the PDF setting, designate into Press Quality or High Quality, and it must include the Bleed.
CMYK vs. RGB
CMYK (Cyan, Magenta, Yellow and Black) are the colors used in the printing process, while RGB (Red, Green and Blue) are the colors used by screen displays such as your monitor. Please note that JPEG files are almost always in RGB. Your document should be created in CMYK mode so that the colors that you see on the screen most closely match the final printed product. If you create your document in RGB, the colors in your printed product may vary slightly. Many of the bright values produced by your monitor cannot be reproduced in print.
Converting Fonts to Outlines
Text can be converted to curves (paths) in some graphic programs. This will fix upload errors that result when fonts are not embedded in your file. Following these easy steps will help ensure that your text prints clearly.
How to convert fonts to outlines in Adobe Illustrator
1. Select all text.
2. Click Type Menu> Type> Create Outlines
3. Text now has a blue outline.
4. Save a copy and re-upload.
How to convert fonts to outlines in Adobe Illustrator
1. Select all text.
2. Click Type Menu> Type> Create Outlines
3. Text now has a blue outline.
4. Save a copy and re-upload.
Vector vs. Raster
What are Vector Images?
Vector images use mathematical equations to define each component of an image. This allows vector images to retain their high-quality at any size. When possible, use vector graphics created in a desktop publishing program. What are Raster Images?
A raster image is composed of a collection of tiny dots called pixels. When these pixels are small, and placed close together, they fool the eye into forming a single image. Raster images work well when subtle gradations of color are necessary. Because they contain a fixed number of pixels, a major disadvantage of raster images is that their quality suffers when they are enlarged or otherwise transformed. They are also large in file size.
Common Mistakes (Important!)
Not full bleed ? If there are images or color in the background, white line is bound to result on the boundary when it is not filled to the end.
Out of safe zone
Safe zone refers to the inner space of 0.2” from the four corners of a document. There is a risk that letters or unintended images may be cut off when they drift from the safe zone.
Low resolution
If an image’s resolution is less than 300dpi, it will not come out clearly. Since the original setting for Photoshop or other image programs dpi is lower than 300, please check and change accordingly.
Placing border
You must delete unnecessary border if you made them in the safe zone or in other unnecessary parts for convenience sake. Delete the unnecessary crop marks as well.
Easy Check List
Check the document size for each product.
Check whether color mode is CMYK.
Check whether the text is located at the safe zone (inner space of 0.2” from the four corners of a document).
Check whether Converting Fonts to Outlines was executed.
Check whether all the effects were subjected to Rasterizing.
|
|
|

ⓒ 2011 - 2012 by Artisore Company, #1558 Marathon, ON. P0T 2E0, Canada. All Rights Reserved